Star Mark/Icon

Decker

New Member
Hi everyone!
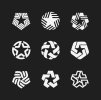
I’ve recently become interested in using geometry and simple shapes to build logos and marks. I’ve stumbled across some geometric star designs and am having a tough time emulating them.
I’ve been able to build the basic shapes with the pathfinder and shape tools. Where I’m having issues is replicating the basic shapes around the outside of the star. I’ve tried the rotate tool, and aligning by eye in wireframe mode. Still not quite hitting the mark. The trouble for me is getting everything to align perfectly.
Does anyone know of any tutorials (i’ve not been able to find any) that could help me build one of these? Have you built one, and can you share your process?
I’m specifically interested on the image in the bottom middle of the attached image. THANKS!
 

Attachments

  • unnamed.jpg
    unnamed.jpg
    92.8 KB · Views: 5
Hey Decker,

I've had experience of this and it's a bit of a pain in the arse and Ai doesn't (that I know) have any way of quickly doing it.
Especially tricky when using a five sided shape like a star as the centre is different depending on the rotation.

The way I found through trial and error was to make a grid from straight lines by rotating them by 72 degrees (for five or ten sided shapes) and centrally aligning them to the artboard.

Then, draw a larger circle and align that too.

The circle is what you're going to use to align all your objects with.

Draw one part of the arm, 5th (or whatever it's called) using the guides as reference but make sure to work within the circle and make it bigger if need be.

Once you're happy group that with the circle, copy > paste in position to a new layer (if you want to be super safe but you don't need to) and rotate that by 72 degrees.
The rotation will now be based on the centre of the circle in the group as it's bigger and not the contents.

Do the same until you have all your sides/parts.

If anything isn't aligned (it should be) just align the group to the artboard and they should all be perfect now.

When you've done just delete the circles you used for position reference and you should be good.

Hope that makes sense.
 
That makes sense! Thanks for looking into that for me :)

I also got a reply on another forum with this method.


94028676030284f7168484f5dcc59401ac78824f.jpg
cbecb0eb0cf73de59ab25d4cc7525e06bca563a9.jpg

On the left is my reproduction of the star shape, on the right is the outline view. Thats right, its only actually “one piece” of the design.
I did a quick redraw of the piece and then by clicking the small “fx” button In the appearance palette and choosing Distort & Transform/Transform I was able to make adjustments.
b69bd2f1c77d1c78020a44d93c088919963816e2.png

The shape, now has a transformation applied that can be turned on and off, and clicked on to readjust the transformation as needed.
IN this case, the following transformation is applied to recreate the affect.


Hey Decker,

I've had experience of this and it's a bit of a pain in the arse and Ai doesn't (that I know) have any way of quickly doing it.
Especially tricky when using a five sided shape like a star as the centre is different depending on the rotation.

The way I found through trial and error was to make a grid from straight lines by rotating them by 72 degrees (for five or ten sided shapes) and centrally aligning them to the artboard.

Then, draw a larger circle and align that too.

The circle is what you're going to use to align all your objects with.

Draw one part of the arm, 5th (or whatever it's called) using the guides as reference but make sure to work within the circle and make it bigger if need be.

Once you're happy group that with the circle, copy > paste in position to a new layer (if you want to be super safe but you don't need to) and rotate that by 72 degrees.
The rotation will now be based on the centre of the circle in the group as it's bigger and not the contents.

Do the same until you have all your sides/parts.

If anything isn't aligned (it should be) just align the group to the artboard and they should all be perfect now.

When you've done just delete the circles you used for position reference and you should be good.

Hope that makes sense.

Bit of a newb question. is there a keyboard shotcut to centrally align to the artboard???
 
That makes sense! Thanks for looking into that for me :)

I also got a reply on another forum with this method.


94028676030284f7168484f5dcc59401ac78824f.jpg
cbecb0eb0cf73de59ab25d4cc7525e06bca563a9.jpg

On the left is my reproduction of the star shape, on the right is the outline view. Thats right, its only actually “one piece” of the design.
I did a quick redraw of the piece and then by clicking the small “fx” button In the appearance palette and choosing Distort & Transform/Transform I was able to make adjustments.
b69bd2f1c77d1c78020a44d93c088919963816e2.png

The shape, now has a transformation applied that can be turned on and off, and clicked on to readjust the transformation as needed.
IN this case, the following transformation is applied to recreate the affect.


Lots of ways to skin a cat in Illustrator. ;)
 
Back
Top